Looking for Something?

Saturday, January 15, 2011

Blueberry & Raspberry Custard Pie

Last year, my dad and I went canoeing together.   During that adventure through incredibly terrifying white rapids, a few events occurred.
a. We capsized.  Twice.  And it was really scary since my head ended up under the canoe at one point.
b. I learned to appreciate life vests.  For the reason stated in A.
c. I saw a bear.  My dad still doesn't believe me, but I saw a bear.  A gigantic, brown, fuzzy bear. After seeing that bear, I adamantly refused to leave the canoe.
d. I picked wild blackberries.  Most of the time we spent on the shore of the creek, I spent picking blackberries.  I fully intended to make a pie with them, but unfortunately was leaving for a summer camp the next day, and never got around to it.
The last point brings me to this pie.  How you say? Well blackberries are berries, and so are raspberries and blueberries.  Not a very compelling argument I know, but this pie is definitely worth my horrible transition from an anecdote to a lovely slice of pie. 
And since next week is finals (midterm) week, I'm definitely going to embrace the opportunity to stress eat. Yum.
Oh, and since I haven't posted since last year: Happy New Years!!!
 
 Blueberry & Raspberry Custard Pie
(adapted from this recipe)
  • 1 1/2 cups blueberries 
  • 1 cup raspberries
  • 1 9 inch pie shell, blind baked (you can use the recipe here)
  • 1 tablespoon all purpose flour
  • 1 cup sugar
  • 1 cup evaporated milk
  • 3 large eggs
  • 1 teaspoon vanilla extract 
  1. Scattered the blueberries and raspberries along the bottom of the pie shell.
  2. In a blender combine the flour, sugar, milk, and vanilla extract, and blend until combined.
  3. Add the eggs, one at a time blending until the mixture is homogeneous.
  4. Pour the mixture over the berries in the pie shell.
  5. Bake at 425 degrees for 15 minutes, then for 35-40 minutes at 350 degrees, until the middle is slightly jiggly, but not wet.  If the edges begin to overbrown, cover the pie with tinfoil.
  6. Allow to cool for an hour, then serve slightly warm, plain, or with a dollop of whip cream.
This picture is really yellow. Hmm, I wonder why.

Friday, December 17, 2010

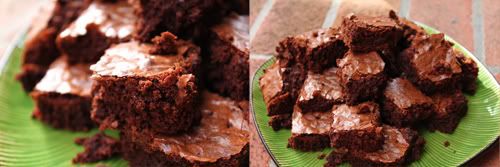
Brownies. Simple, fantastic, Brownies.

 
It seems like good days are good for most people, and bad ones bad for everyone.  Like when you have good luck, there's luck in the air, so everyone else has a similar fate.  But when the luck goes awry, suddenly everyone is left scrambling, unsure of what to do.  That could be just this week, the week which my teachers have decided that because winter break is soon, they must cram all they have neglected to teach.  Or it just could be the whole luck thing. Yeah.

         At times like these, I really just need to step back and make brownies.  Simple, chocolate brownies.  Neither cakey nor fudgy, with an irresistable chewiness and crackly crust.  Yes.  Brownies.... :)

           In honor of the brownie, let me present my favorite recipe for them.  Very healthy (not!) and extremely delicious.  The strange method of boiling the water, butter, and sugar produces a lovely, shiny crust.  And they're super chocolately, with a whole 3 cups of chocolate chips! Use high quality chocolate, for the most deluxe brownies ever!

 
Brownies
Sift together in a large medium bowl:
1 cup all purpose flour
1 tsp salt
1 tsp baking powder
Bring the to a boil and boil for 30 seconds:
4 tablespoons butter
4 tablespoons water
1 cup sugar
Turn off heat and stir in:
3 cups chocolate chips
Allow the mixture to cool before adding:
4 eggs, one at a time (or 2 eggs and 4 egg yolks, for richer brownies)
2 tsp vanilla extract
Stir in:
the dry ingredients
Spread the batter into a 9x13 greased pan and bake at 350 degrees for 25-30 minutes.

The pictures above, edited slightly different.  I'm still sure which I prefer. :O

Saturday, November 27, 2010

Pear Cake with Cream Cheese Frosting and Buttermilk Caramel Sauce

         For some reason, a majority of the birthdays in my family are in November.  Because of this I have found that during November I am constantly baking birthday cakes, pies, or whatever a person might request.  Then, smack in the middle of all this chaos you have Thanksgiving.  Don't get me wrong, I love Thanksgiving and all the food I get to eat, but ahhhh, I literally bake from 8 in the morning to 10 at night.  This year I made rolls, pumpkin pie, vegan pumpkin pie, pecan pie, and chocolate pudding pie. 
        So, anyways, the point I was getting to is that the busyness of November the reason this blog is so neglected, and come December (AND WINTER BREAK!) I  think I'll have more time.  But for now, here's an amazing recipe for pear cake (the recipe my Godmother requested for her November Birthday).

 Buttermilk Caramel Sauce [adapted from here]
3/4 c. buttermilk
1 1/2 c. sugar
1 stick real butter
1 tsp. baking soda
1 tsp. vanilla

Combine all the ingredients (but vanilla) in a large pan, and boil until a deep caramel color.  Allow to slightly cool before stirring in vanilla.  Refrigerate leftovers.

Pear Cake [adapted from here] 
3  ripe Bartlett pears, peeled and diced (about 2 cups)
2 tsp  sugar
2 large eggs
4/3 cups  sugar
scant 1 cup  vegetable oil
2 cups  all-purpose flour (or use Pamela's Baking & Pancakes mix to make GF)
2/3  teaspoon  salt (1/2 if using Pamela's)
2/3 teaspoon  baking soda
2/3 cups  pecans, coarsely chopped
1 1/2  teaspoons  vanilla extract
1/3 cup buttermilk caramel sauce (recipe above)

Toss the pears and 2 tsp of sugar and leave to stand for 5 minutes.  
Mix the eggs, oil, and 4/3 cup sugar with a whisk until combined.
Whisk in the baking soda, salt, and vanilla.
Gently fold in the flour, followed by the pecans and finally the pears.
Pour the batter in a greased 9 x 13 pan and ladle the sauce over.
Bake for 45 minutes, or until a toothpick comes out clean. (make sure you're testing the cake, not just the pears)  
Frost with Vanilla Bean Frosting (recipe below)

Vanilla Bean Frosting
 8 ounces cream cheese, room temperature
1/2 cup butter (1 stick, 8 tbs), room temperature
2 cups powder sugar
1 tsp vanilla bean paste (or vanilla extract)
Beat the cream cheese and butter in a hand or stand mixture until fluffy.  Gradually add in the powder sugar and beat for 5 minutes.  Stir in the vanilla bean paste.

Sunday, November 14, 2010

Quinoa Chocolate Cake and Chocolate Frosting

I have some odd habits when it comes to baking.   For one thing, 70% of the things I bake are gluten free.  Not because I, or even someone I know is gluten intolerant, just because from a young age, I was told that eating gluten is bad for you.
This mentality began when I was seven and my dad decided to switch to an all raw diet.  One of his new beliefs was the idea that grains are bad for you (meant only for birds or something), especially grains containing gluten.
Ha! I don't know whether this is true, but I still try to cooperative with my dad's eccentricity none-the-less.  So, when I saw a picture of beautiful picture of chocolate cake on Babble.com, imagine my surprise when I realized it was completely gluten-free!
My dad even joined me to try a slice.  (His first slice of chocolate cake in more than 7 years!)
As a testament to the magic of this cake, I am fairly certain that my dad has been sneaking bites of it when no one's looking. Hmmm.
 
GF Quinoa Chocolate Cake (found here)
2/3 cup white or golden quinoa
1 1/3 cup water
1/3 cup milk
4 large eggs
1 tsp vanilla extract
3/4 cup butter, melted and cooled
1 1/2 cups sugar
1 cup cocoa powder (high quality!)
1 1/2 tsp baking powder
1/2 tsp baking soda
1/2 tsp salt

Rinse the quinoa, and then combine in a saucepan with water over medium heat.  Bring mixture to a boil, and boil for 10 minutes.  Turn off heat, and leave the saucepan covered for 10 minutes.
Meanwhile, in a large bowl, sift together the sugar, cocoa power, baking powder, baking soda, and salt.
In a blender or food processor, combine the eggs, milk, and  vanilla extract. Pulse until combined.  Add the quinoa and butter, and blend until smooth.*  Pour the mixture over the dry ingredients, and stir until moistened.  Divide the batter among 2 greased 9 inch cake pans, and bake for 30 minutes at 350 degrees, or until toothpick comes out clean.
*note: If you don't blend until completely smooth, the final cake will retain some of the quinoa's texture. I loved the additional texture (that I got by neglecting to fully blend it), but I doubt most people would.

Chocolate Frosting (found here)
1/2 cup (1 stick) butter or margarine
2/3 cup cocoa
3 cups powdered sugar
1/3 cup milk
1 teaspoon vanilla extract

Combine the butter and cocoa, and alternate between adding the milk and powder sugar.  Whisk in the vanilla.

Friday, November 5, 2010

1 Minute Macadamia Nut Nutella

        About half a year ago my family received a box of chocolate covered Macadamia nuts.  Inside this box there were at least 60 of these chocolates, way too much for even an average family to consume.  Add a dad who doesn't eat chocolate, a mom who prefers savory food, and me who just doesn't love nuts...except when in Nutella. 
       In a whim, realizing these chocolates were very near their expiration date, I tossed them in my food processor, and sat back while they blended into a silky cream. (which took less than a minute, if you were wondering)
       This has to be the greatest 1 ingredient food ever.  How can a silky smooth, chocolately, macadamia nutty spread not be? 
       Now, please excuse me.  I need a moment alone with just a spoon and this nutella.

Macadamia Nut Nutella
Blend chocolate covered macadamia nuts into a food processor until silky smooth.
(the mixture will go through several stages, chunky, crumbly, clumpy, watery, silky smooth)

Sunday, October 24, 2010

Pumpkin Crumble "Pie" w/ Vanilla Whipped Cream

It's no secret that I'm a lazy baker.  Well, a lazy person in general.
I don't like walking places, I'd much rather drive (or bike to save the environment).
I'd rather take a nap then go sightseeing,
and I tend to making the same simple recipes over and over.
My brother calls me "The Laziest Atheletic Person"
When I'm inspired, I'm completely different.  I can stay up all night making a four layer cake, sprint constantly during a soccer game, and bake 5 dozen cupcakes to sell for charity.
Yeah...except last night I wanted pumpkin pie.  I really wanted pumpkin pie.  I had just had two soccer games, was feeling lazier than ever, and I wanted pumpkin pie.  So I made pumpkin pie. 
Kinda.
Let me introduce you to Pumpkin Crumble.  It's what happens when you combine pumpkin pie and apple crumble.  It's easy to make.  And there's no finicky pie dough.  Hurrah! 
For the pumpkin pie filling, I used a recipe I had been eyeing for a while. It was good, but slightly overcooked (my fault!)   The crumble recipe I used is my "go to" crumble recipe.  The crumble was absolutely delicious!  Crunchy, sweet, and cinnamony. The crumble slightly sunk into the pie filling while baking, which I figure could be solved by slightly baking the filling before spreading the crumble over it, but I wouldn't bother with that.  This recipe is suppose to be simple, so let it be just that. :)
Oh, and all these pictures were taken by my new SLR camera (Canon Rebel T1i)!  So far, the images are so much crisper on my new camera.  :) It's been rather muggy lately so the lighting wasn't great when I took these photos, but I'm hoping next week there will be more sun (and more rain!).
Pumpkin Crumble Pie

Ingredients:
1 recipe pumpkin pie filling [here]
1 recipe crumble [below]
1 recipe whipped cream [below]

Pour the pumpkin pie filling into a buttered 9 inch round ceramic or glass cake pan, and gently sprinkle the crumble on top.  Bake at 375 degrees for 15 minutes, then lower the temperature to 350 degrees and bake for 20 minutes more, or until the filling is set, but the center still jiggles when shook.  Chill until completely cold, and dollop with whipped cream before serving.

Cinnamon Crumble:

Ingredients:
1/2 cup brown sugar
1/2 cup all purpose flour
1/4 cup butter, chilled (1/2 a stick)
1 1/2 tsp cinnamon

Whisk together the sugar, flour, and cinnamon.  Cut the butter in with a fork or your fingertips, until completely combined.  (if you use your hands, be careful not to melt the butter)

Vanilla Whip Cream

Ingredients:
1/2 cup heavy whipping cream
2 tbs powder sugar
1 tsp vanilla extract

Whip the cream, sugar, and vanilla together until soft peaks form.

Tuesday, October 5, 2010

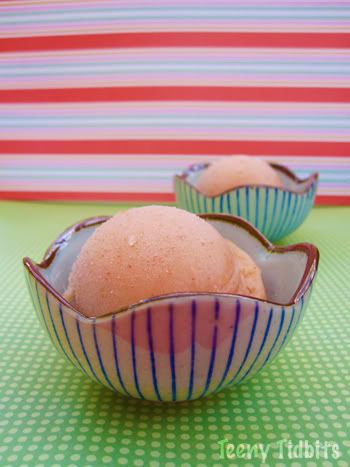
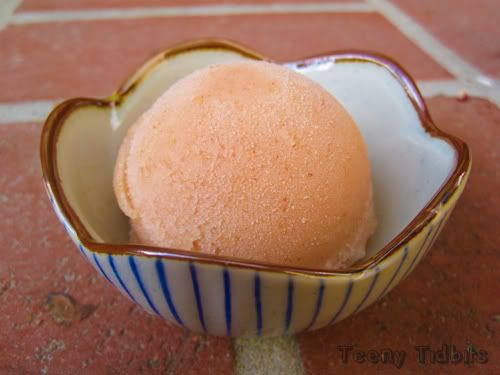
Pear Sorbet

sorbet.jpg picture by nomachomp
It's pear season.  And back to school season (well, a little bit after that).

That means:
a.  school=no free time=no updating blog
b. pears=sorbet
c. school=blog being neglected!
d. pears=sorbet
e. school=blog becoming a coffin
f. pears=sorbet

So, in an attempt to revive my blog, I'm here today to share some great news!  First of all, I *might* get an DSLR camera for my birthday (Canon Rebel) and secondly it's pear season, which means s-o-r-b-e-t.   I don't know about you, but in my opinion there's nothing better for getting the mind off school related stress then watching pear puree churn into delicious sorbet.  Seriously.  It's hypnotic.

So, if you're like me and facing stress right now, just scroll down a little bit, whip out an ice cream maker, grab some organic pears, and make some delicious pear sorbet.
Photobucket


Pear Sorbet
adapted from The Perfect Scoop by David Lebovitz

4 ripe pears, pealed cored *note: I used two Red Anjou pears (& didn't peel them) to get the peachy color.
1 1/4 cups water
2/3 cup sugar
1 tsp fresh lemon juice

Cut the pears into 1 inch cubes, and place in a nonreactive saucepan with 1/2 cup of water.  Cook over medium heat for 15 minutes until soft, and beginning to caramelize.
Let the pears cool for a few minutes, then transfer to a blender or food processor with the remaining 3/4 cup water, sugar, and lemon juice.  Blend until completely smooth.
Chill until cold (don't churn it unless completely refrigerated) and then process in an ice cream machine.
Scoop into a container and freeze for another couple hours until as hard as desired.